- 自动化系统
- 驱动技术
- 低压电气
- 工业服务
- 其他
PCS7 V6.1 SP1 StoragePlus和Central Archive Server安装指南


- 0
- 357
- 3474
Storage Plus和Central Archive Server安装指南
计算机硬件要求
为了保证软件运行的性能,以下为推荐的计算机硬件配置:
| 软件 | CPU | 内存 | 硬盘 |
| StoragePlus | 奔腾4或性能相当的CPU | 1GB | 80GB |
| CAS | 奔腾4或性能相当的CPU | 1GB | 120GB |
| 主频2.8GHz以上 |
其他注意事项:
- StoragePlus和CAS都需要运行在一台单独的计算机上,不能和PCS7其他软件,如ES、OS混合安装使用。
- 推荐使用RAID1硬盘增强数据可靠性
- 推荐使用不同的硬盘分别存储数据库文件(.mdf)和数据库记录文件(.ldf),以优化性能。
- 为了方便数据备份,可配置CD或DVD刻录设备
操作系统要求
| 软件 | Windows操作系统 |
| StoragePlus | Windows 2000 Professional/Server SP4 |
| Windows XP Professional SP2 | |
| Windows Server 2003 (Standard Edition) SP1 | |
| CAS | Windows Server 2003 (Standard Edition) SP1 |
| 所有操作系统均为英文版(PCS7 V6.1 SP1 Chinese要求英文版+多语言包) | |
| 操作系统的SP可以从PCS7安装包里的MS Tools光盘中获得 | |
操作系统其他注意事项:
- 计算机名中不允许使用下划线’_’!
建议只使用英文字母和数字,且首字符必须为字母。 - 禁止在StoragePlus或CAS计算机上安装杀毒软件或运行任何病毒扫描操作,这会影响服务器的性能
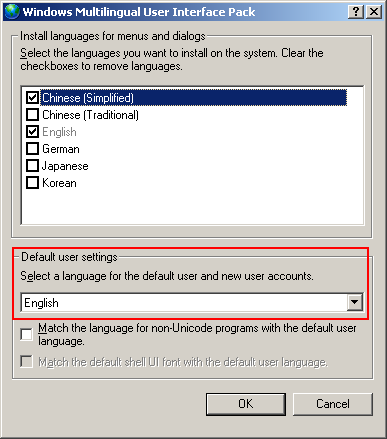
- 安装StoragePlus或CAS时,登陆的用户使用的语言必须和系统缺省用户(Default User)使用的语言一致!
对于PCS7 V6.1 SP1 Chinese版本,需要操作系统Windows Server 2003 (Standard Edition) SP1英文版 + MUI(多语言包)或Windows XP SP2 英文版+ MUI(多语言包)。安装多语言包时,系统缺省用户(Default User)使用的语言在下图的对话框中指定:
安装步骤
第一步,安装操作系统和MS Tools
按照要求安装相应版本的Windows操作系统。
运行PCS7安装包中的MS Tools光盘,根据Windows操作系统选择相应的Service Pack,Security Patch和Hotfix。Windows 2000 系统还需安装IE 6.0 SP1。
关于Windows安装的详细内容,请查看文末的参考资料。
第二步,安装并配置IIS, Message Queuing
IIS(Internet Information Service)和Message Queuing Service是StoragePlus和CAS必须的Windows组件。
- 安装Message Queuing Service
Windows 2000和Windows XP:
在Windows安装完成后,进入Control Panel,选择Add or Remove programsAdd/Remove Windows Components选中Message Queuing安装。
Window Server 2003:在Windows安装完成后,进入Control Panel,选择Add or Remove programs ® Add/Remove Windows Components ® Application Server,点“Details”,选中Message Queuing安装。
- 安装配置IIS
Windows 2000和Windows XP:
在Windows安装完成后,进入Control Panel,选择Add or Remove programs ® Add/Remove Windows Components,选中Internet Information Services (IIS)安装。
Window Server 2003:在Windows安装完成后,进入Control PanelAdministrative ToolsManage Your Server。点击“Add or remove a role”,按照图1-图4进行操作。

图1 选择Add or remove a role

图2 选择Custom configuration
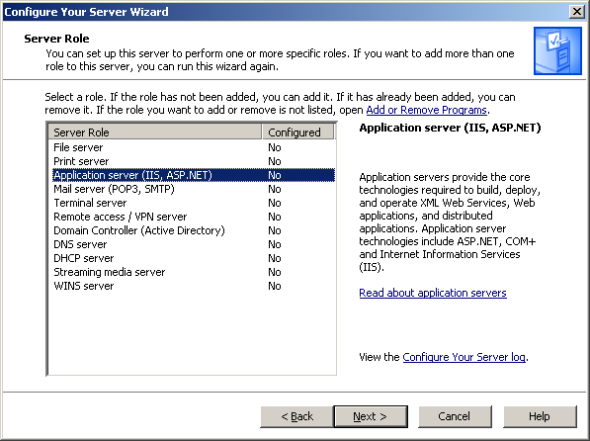
图3 选中Application server (IIS, ASP.NET)

图4 选中Enable ASP.NET
| 注意: 1) 如果您的Windows Server 2003操作系统是从镜像文件(例如Ghost等软件生成的镜像)恢复,且恢复的镜像系统已经完成了IIS和ASP.NET的Server role的配置,则必须重新配置!否则StoragePlus或CAS无法正确安装。重新配置方法如下: 首先进入Control Panel ® Administrative Tools ® Manage Your Server。按照图5-图8删除原IIS和ASP.NET配置,然后重复图1-图4的步骤安装一遍。 2) 如果您的StoragePlus/CAS系统是从镜像文件(例如Ghost等软件生成的镜像)恢复,那么恢复的系统可能不能正常工作。推荐恢复到操作系统,并按照前面步骤重新配置IIS和ASP.NET,然后重新安装StoragePlus/CAS。 |
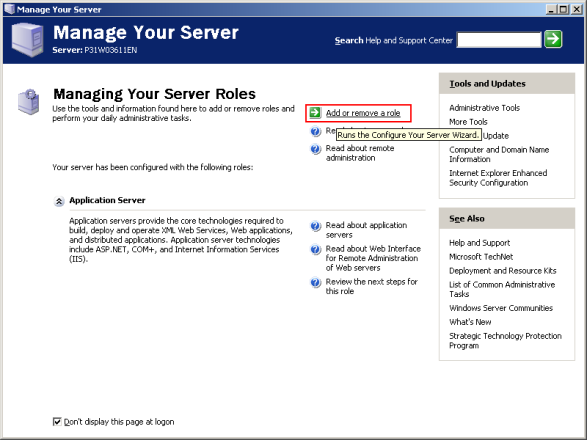
图5 选择Add or remove a role
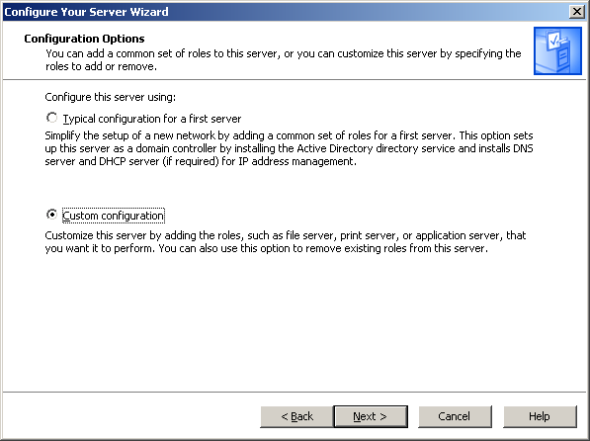
图6 选择Custom configuration

图7 选中Application server (IIS, ASP.NET)

图8 选中Remove the application server role
第三步,安装Microsoft SQL Server
安装随PCS7安装包提供的SQL Server 2000 SP3a。
第四步,安装 Microsoft其他组件
在PCS7 Tool set DVD中找到Microsoft目录,根据操作系统选择下列目录中的组件进行安装:
| 软件选项 | 操作系统 | 安装目录 |
| StoragePlus | Windows 2000/ Windows XP | MS_for_StoragePlus_W2K_XP |
| StoragePlus | Windows Server 2003 | MS_for_CAS_StoragePlus_W2003 |
| CAS | Windows Server 2003 | MS_for_CAS_StoragePlus_W2003 |
MS_for_StoragePlus_W2K_XP目录下的内容和安装说明:
| 1. Microsoft .NET Framework | 首先安装目录[1.1]下的dotnetfx_en.exe |
| 然后安装目录[SP1]下的NDP1.1sp1-KB867460-X86_en.exe | |
| 2. Microsoft .NET ODBC Provider | 安装odbc_net_en.msi |
| 3. Microsoft Data Access Components | 安装目录[2.8]下的ENU_Q832483_MDAC_x86.EXE |
| 4. Microsoft Office Web Components | 安装目录[10]下的owc_10_enu.exe |
| 安装完成后,重新启动计算机 | |
MS_for_CAS_StoragePlus_W2003目录下的内容和安装说明:
| 1. Microsoft .NET ODBC Provider | 安装odbc_net_en.msi |
| 2. Microsoft Office Web Components | 安装目录[10]下的owc_10_enu.exe |
| 安装完成后,重新启动计算机 | |
| 注意: 相应目录中包含多个组件,请按照其子目录的标号顺序安装! 这些组件一定要从上表列出的目录中安装,不要安装‘25_StoragePlus__V1.1+SP1’目录中的任何组件! |
第五步,安装StoragePlus/CAS
运行PCS7 DVD中的Setup.exe。根据提示选择Package Installation,如图:

图 选择Package Installation
在接下来的对话框中选择相应的选项,只选择StoragePlus或者Central Archive Server,不要选择任何其他选项!

图9 安装StoragePlus的选择
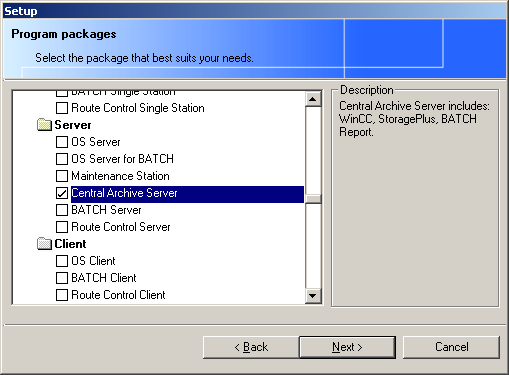
图10 安装CAS的选择
| 注意: 一定要从运行PCS7 DVD中的Setup.exe选择Package安装,不要运行‘25_StoragePlus__V1.1+SP1’目录中的任何安装程序! |
第六步,设置StoragePlus/CAS归档文件路径
安装开始后,首先会出现StoragePlus/CAS归档文件设置对话框,如图11所示。
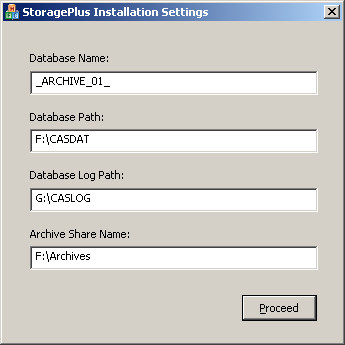
图11 设置StoragePlus归档文件路径
请参照下表的要求进行设置:
| 选项 | 含义 | 设置建议 |
| Database Name | StoragePlus归档数据库名称 | 使用缺省值,不要修改 |
| Database Path | SQL Server归档数据库文件(.mdf) 存储路径 | 1.不要使用Windows系统所在的分区。 |
| 2.不要和Windows虚拟内存文件(Pagefile)在同一个分区。 | ||
| Database Log Path | SQL Server归档数据库日志文件(.ldf) 存储路径 | 3.Database Path和Database Log Path可以使用同一个路径。推荐配置两块硬盘,将Database Path和Database Log Path设置到不同的硬盘上,可以优化数据库性能。 |
| Archive Share Name | 归档共享文件夹路径(WinCC数据交换文件备份路径) | 4.建议Archive Share的路径最后一个文件夹的名称保留系统默认名称’Archives’ |
参考资料
| 文件 | 位置 |
| pcs7-readme.wri | PCS7安装DVD根目录 |
| PCS 7 - PC Configuration and Authorization.pdf | PCS7安装DVD ‘_Manuals\English’目录 |
关键字
PCS7 V6.1 SP1, StoragePlus, Central Archive Server, CAS, 安装
- 评论
 关联文档
关联文档
 看过该文档的用户还看过哪些文档
隐私政策更新提示
欢迎您来到西门子数字化工业支持中心网站!我们使用cookies来确保您能最好地使用我们的网站,进行网站分析并根据您的兴趣定制内容。我们有时会与第三方共享cookie数据。继续浏览本网站,即表示您同意我们使用cookies。您亦可以参考西门子数据隐私政策以了解更多相关信息。


 西门子官方商城


扫码分享